Marking the Pieces
In Lesson 5, we start sewing the jacket pieces together. Before we can sew a thing though, it is necessary to make sure all our pattern pieces are marked properly.
There are two things that Ms. Knight has us do by way of marking.
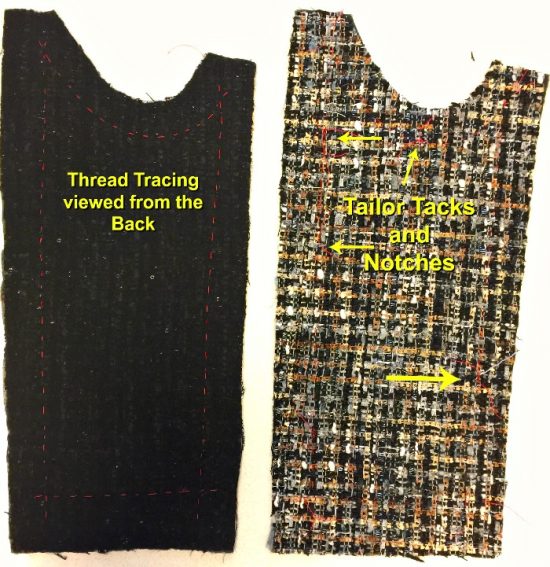
The first thing is to mark the pattern markings like the dots where the pattern pieces line up. She has us do this with what I call, the traditional tailor’s tack.
I find that many times throughout my sewing, I will mistake my tailor tacks for random pieces of threads laying on my fabric. After removing them (pulling them out), I realize what I have done.
My solution is a more secure tailor tack that I do on a single layer of fabric. Yes, it’s more work but I never have to re-do a tailor tack using this method. I also use a silk thread for this process. Because it is so slick, it makes removal of the tack super simple – I demonstrate in the video below.
Thread Tracing
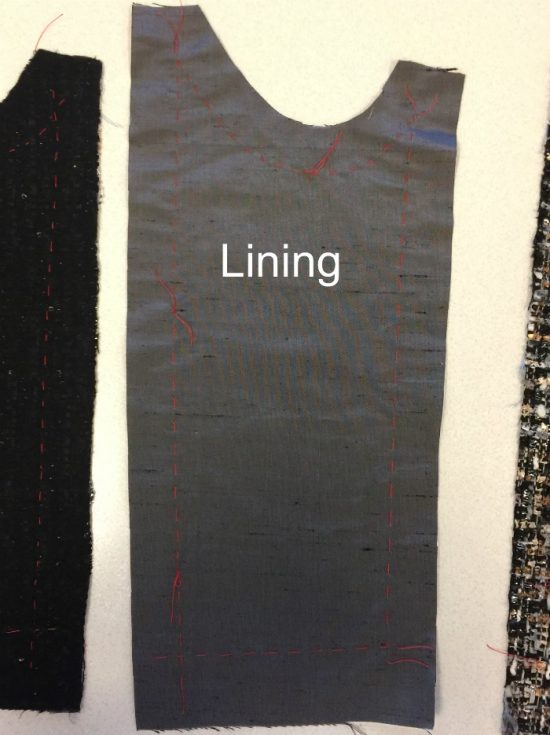
The second part of the marking process is to thread trace around the neck edge, down the center front and along the hem (on the jacket fabric, not the lining). She will use these thread traced lines as guides for placing the stabilizing tape in the next step.
There are several things I chose to do differently.
First of all, my pattern pieces do not have the 1″ margin built in. They have zero margin which means that I had to cut around the edge of each pattern piece giving myself that 1″ seam allowance. I told you in a previous post that I do not like sewing with a 1″ seam allowance. I just don’t feel I’m as accurate.
So once my pattern pieces were cut out, I thread traced around the entirety of each pattern piece so that every seam is visible in thread. I did this by hand with silk thread using a long running stitch.
Like Ms. Knight, I love the silk thread for this process because it pulls out of the fabric with ease, whereas other threads like cotton or polyester may leave pieces behind especially if you sew through them.
I did this on both my jacket fabric as well as on my lining fabric.
Another thing I chose not to do was to cut any notches. I prefer to mark the notches with tailor tacks.
The process of putting a pin in your jacket pieces to mark the right side of the fabric is a great idea. Since my pieces are all interfaced on the backs, this was not necessary for me.
Pocket Detour
At this point, Ms. Knight discusses putting tailor tacks to mark her pocket placement. This is the only mention she makes of the pocket in this lesson.
ALERT: If you intend to put pockets on your jacket, this is the point where you need to decide how you will actually use those pockets. Skip ahead to Lesson 9 – Pockets, where Ms. Knight shows how to interface the pattern piece that will have the pocket attached. You MUST do this part of the project NOW! Once we get to Lesson 9, it will be too late.
Only you can determine whether or not interfacing behind that pocket is necessary on your jacket. This would be based on how you intend to use the pocket, your fabric, and how stable you feel it is in its original state.
Stabilizing the Edges
Stabilization of the outermost edges of the jacket will help the appearance of the finished jacket – adding the stabilizer will help keep everything looking nice and flat.
The process in this class is to lay the stabilizing tape or selvage edge of your silk organza along the seam line on the wrong side of the fabric – on the jacket side of the seam line. Be sure you are not sewing the stabilizer tape to the seam allowance side of the seam line. I had a friend do this to her entire jacket before she realized what she had done and had to tear it all out and start over.
The stabilizing tape will go around the neck edges, down the center front pieces, and follow all the hem lines (including the hem lines of the sleeves).
Ms. Knight stitches her stabilizer down using two hand stitches. I think this was a good suggestion because it keeps the stabilizer tape from puckering around the curved edges when the fabric moves.
She first sews the edge down along the seam line using an overcast stitch. Note: the red running stitch is the thread-traced seam line. Once the inner edge of the stabilizer tape is overcast/stitched down, she anchors the rest of the tape with a herringbone stitch, also known as a catch stitch.
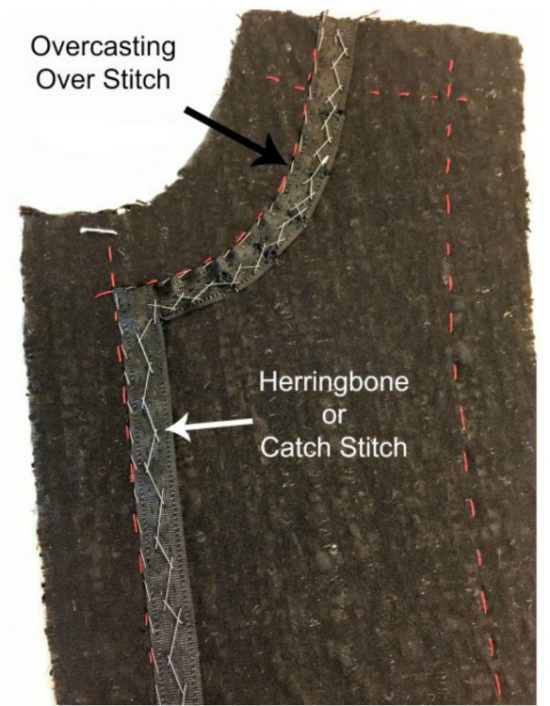
I believe the most important thing in this section is to sew on the inside of your jacket and not to allow your thread to go through to the front. Of course, with a spongy bouclé, your threads, provided the color is matched well, will probably not be visible from the front.
Starting to Sew
The “couture” way to construct this type of jacket is to first quilt all of the lining pieces to the jacket pieces. I discovered this when reading articles in Threads Magazine written by Susan Khalje (See Issue 121) “Inside a Designer Jacket” and by Claire Shaeffer, “The Comfortable Side of Couture, Practical Techniques of Coco Chanel” Threads Magazine June/July 1989 No 23 (sorry, could not find a link to this article).
If you choose the couture way however, you are choosing to do more hand work to stitch the lining pieces together.
This class is cutting a corner and reducing a number of hand stitching requirements. By first sewing the front center pieces to the front side pieces in both the lining and the jacket fabric, and doing the same to the back and side back pieces, Ms. Knight eliminates our need to hand stitch four of the seams in the lining. Definitely a time saver.
For the sake of “checking it all out”, I decided to follow Ms. Knight’s instruction for the back and side back pieces but to do the couture method for the front pieces. I chose to do it this way because the princess seam in the front are more prominent/curvy if you will while the back panels lie flatter. My rationale is that, less curve means basting the lining to the fabric pieces before quilting should prove to be easier – less chance for the lining to wrinkle, if you will.
I will discuss the basting and quilting in my next post.
Princess Seam Pattern Matching
I have had some difficulty in this particular part of the class.
Ms. Knight sews her center front to her side front, inspects her pattern matching and determines that the pattern match is off through the bust curve of the seams. You can see in the photo below (freeze frame from the class video), where the dominant black lines of the fabric’s pattern go off slightly at the seam between the center front and the side front pieces.
At this point, the instructor proceeds to rip out her stitches in that mismatched area and re-pin the section so that the fabric pattern matches.
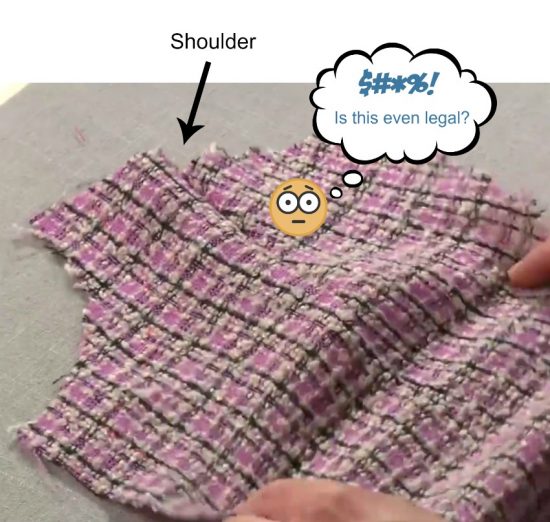
As you can see in the picture below (another freeze frame of the class video), the dominant black lines in the fabric’s pattern now match through that princess seam. However, look at the shoulder seam which is now at least 1/2″ off.
Here is my dilemma. . . garment patterns have lines on them and notches and other matching points – for a reason. Any time you make an adjustment to a line on one pattern piece, it affects what is happening on the adjacent pattern piece.
When all pattern work is completed in the fitting process, the pattern pieces are trued up so that everything is in alignment. Therefore, it is my understanding that you cannot just move something out of place without experiencing some sort of domino effect.
The instructor states in the video that this shoulder line discrepancy is okay because with the 1″ seam allowance, there is “a little bit of leeway”. I do not believe this is correct because that would suggest that the leeway we are using here is within that 1″ seam allowance. Architecturally, the seam line on one piece has been moved at least 1/2″ lower than its adjacent piece. This would indeed have an affect on the final garment. In my mind, by doing this we would be making a change to the pattern (the seam line on one piece only).
We never see the finished jacket being worn on a human being so how the little bit of leeway that was taken actually affected the final garment’s appearance will remain a mystery.
Back to the point. . .I think there are two things at play here.
First, after watching a billion a lot of Craftsy classes, I believe that there is little to no editing whatsoever in these classes. Which basically means that the instructor cannot do a re-take if a mistake happens during the filming. Again, this class is billed as “Advanced” so in theory, if you are an advanced sewist, you probably won’t be making this particular mistake – because you understand the repercussions.
Second, after pondering the pattern matching through the princess seam dilemma, I went out and looked as closely as possible to every classic jacket I could find with pattern matching through a princess seam. They all match and they all look like they fit. BUT, they were all on skinny models who fit the small size of the jacket pattern.
I find that in my jacket, size 10 with no bust adjustment (the same size BTW as that which the instructor is using), I too have a slight issue with my fabric pattern not lining up through that princess seam.
Without moving the shoulder seams, I was able to manipulate my very loosely woven fabric so that the pattern matches. I was basically easing my fabric lines rather than moving the shoulder seam line on the jacket. The leeway I took was inside the seam lines and markings. Hopefully I didn’t adversely affect my fit.
I believe that the larger the curve (the fuller the bust), the more the pattern lines in the fabric will skew to a point where this kind of manipulation will not work without adversely affecting the fit of the garment.
In conclusion, if you are a person who needs the full bust adjustment, you might be better off choosing a classic jacket pattern with no princess seam or choosing fabric with no pattern to be matched.
Pressing the Seams
One of the first things you learn, when you learn to sew, is that pressing your project can make all the difference to the finished appearance of your garment. The difference between – “Where did you get that!” and the dreaded “Did you make that?”
Pressing is key. My fabric has something that melts in it with too much heat (found this out the hard way) so I have been using a pressing cloth (my piece of silk organza) in between my iron and my fabric.
One pressing tip that I feel has been very helpful to my finished items is when you are pressing with steam, allow your piece to cool and dry completely before moving them. I also invested in a tailor’s clapper. The use of the clapper helps to flatten your seams so that they are nice and crisp.

Sewing the Sleeve
The sleeve pieces have an ease at the shoulder. It does not appear as though there is a need to do the same “easing” of the lining piece. At least there was no mention of it in the class or in the class questions. So I did not put any ease in my sleeve lining pieces.
Next up. . .
Lesson 6 – Quilting the Jacket
This is the part of the class I think I like the best! Until then, good luck with your pattern matching and sewing and
Thanks for reading. V