Making a Muslin (muslin = toile)
Lesson 2 is a brief overview of fitting the jacket. The instructor goes over the very basics so if you are struggling with the fitting process, I recommend you read through the class comments (the majority of which deal with bust alterations).
The first question we ask ourselves is, is it necessary to make a muslin? For me, the answer is always yes. Simply because I want my garment to fit as best it can. I also like to see how the construction of the garment works prior to cutting my fashion fabric.
The next questions are, what fabric should I use, and should I cut up my pattern pieces or trace them.
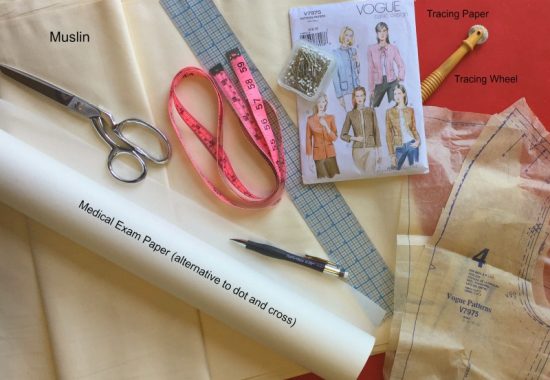
The general rule for making a muslin is that you should use something inexpensive that is similar in weight and stretch to your final garment. Even though you may be using a bouclé or tweed for your final jacket, it will be quilted which will eliminate most of the stretch. For this jacket, muslin or cotton will work. If you have it, a heavier weight muslin or poplin is also a good choice and may help you get a better idea of the ease needed.
Personally, I do not like to cut my pattern so I take the time to trace all of the pieces onto medical exam paper. This way I can erase, cut, and tape to my heart’s content without worrying about destroying my original.
I also like to use a 1″ seam allowance for my muslins. This is very helpful if you find yourself needing to let out a seam for example. An inch gives you some working room.
It should be noted that the 1″ seam allowance can be a bit cumbersome in the neck and armholes. To remedy this, simply make several clips into the seam allowance up to, but not through, the seam line.
 The photo I have here is not the jacket for the class, but a muslin I had that has some good visuals. I want to point out a few things that have worked well for me.
For this project I recommend you construct the entire bodice and the sleeves. Use a long stitch length so that you can open seams easily if necessary.
When fitting, you might find it helpful not to sew the shoulders together but to pin them along the seam line.
It can also be helpful to attach the sleeves with pins rather than sewing them into the bodice. This way you can work with the sleeves without having to rip the seams.
I either thread trace (by machine) or use tracing paper and a wheel to go over all seam lines and pattern markings. I have found it is most helpful to actually be able to see things clearly when trying on a muslin (if you do this, use a contrasting color).
In researching the fitting process, I ran across a blog called – Thewallinna. The projects on this blog are definitely done at an Advanced/Couture level and the information is absolutely fabulous. I strongly advise you pay her a visit – especially for a lesson on making a muslin.
Personally I try my garment on right-side-out. For this reason, I also press my seams open so that I can see how everything looks without bumps and lumps of unpressed seam allowances.
When trying on the muslin, it is important to wear a similar weight of shirt, blouse, or camisole under the muslin that you expect you will be wearing under your finished jacket.
A while back I watched a series of three videos through Threads Magazine. I am not sure if you need a membership but here is the link: Video: How to Fit Yourself with Sarah Veblen, Part 1. Here she takes you through some methods of getting visuals of yourself, by yourself.
Pin the muslin closed at the center front and make sure everything is straight so that you can see where drag lines and bunching are occurring. I recommend you do this even if you do not plan to wear your jacket closed or with buttons.
Once you are all in order and standing in front of your mirror, just look at yourself and how the muslin is sitting on your body.
Notice how the shoulder seams lay. Do they match up to your shoulder slope or do they need to be adjusted forward or backward?
Where does the shoulder seam meet the sleeve seam? Does it hit right at the place your arm pivots or does it fall somewhere lower over the curve of your shoulder?
Can you comfortably lift your arms and move them forward or is the muslin too tight.
How does the neck lay? (Remember you have a 1″ seam allowance up there too, so go by that traced line). Is it laying flat or does it pucker?
How does the bust look? Are the bust points lining up or are they high or low in comparison to yours? Is the center front flat or is it puckered or showing pull lines?
NOTE: If you are seeing issues in your center front and are thinking – “I’ll just cut my center front” – this is a bad idea – don’t do it! (I believe that in general, this also applies to the center back in most cases but with the center back, I believe there are also exceptions). Make your alteration in another area or seek professional guidance.
I am petite, therefore it tends to be necessary for me to adjust my pattern (shorten it) somewhere between the shoulders and the bust. There are never any lengthen and shorten lines in patterns in this location unless it is a “petite” pattern.
Where are the lines for your waist? Do they hit at your proper waist or are they too high or too low? Make sure you know where your waist really is (sounds obvious, but maybe not so – so take your time).
How do the sleeves feel? Are they tight in the biceps or forearms and wrist? Specifically think about the fabric you will be using and how much bulk will be added when the sleeve hem is turned. Will they be comfortable around your wrists? The ease in the sleeves should be sufficient to comfortably accommodate whatever you are planning to wear underneath.
And finally, how is the length? Are your hem lines at the most flattering place for your jacket.
I use a pencil to draw lines on my muslin where I plan to make changes. If using a marker, be sure it won’t bleed through to your garments. At this point, having someone to move things around and pin while you stand still will be the easiest. If you don’t have someone to help, try writing things down as you notice them, take off the muslin, make the modifications, retry, and continue this process until you are satisfied you have a nice fit.
If you need more instruction on fitting, check the list of Craftsy classes at the end of this post.
Making and Marking the Pattern
Once you get your muslin fitting properly, your next step is to create your pattern.
Unfortunately, there is virtually no information in this lesson for the Intermediate sewer other than to trace the muslin piece onto dot and cross paper making sure there is a 1″ seam allowance.
Since I have made two previous iterations of this jacket, I have a few things I would like to mention that may be of help to you at this point in the class.
 Unless you are super lucky, you will have some alterations in your muslin that you will need to transfer to your paper pattern. If you are planning to use your muslin pieces as your pattern and you want more information on the process, see the Thewallinna post. Since Ms. Knight is using a paper pattern, and so am I, I’ll stick with it for the rest of this post.
If you choose to use your pattern tissue (and not trace your pattern onto something else), you must add 3/8″ to the 5/8″ seam allowance. Since the pattern pieces are full of lines already, both your pattern modifications and your cutting lines can become confusing so be sure you clearly mark everything.
ALERT: Ms. Knight uses her unblemished muslin to trace her final pattern onto dot and cross paper. If you follow her direction and you have made modifications to the muslin you have cut apart, I recommend placing your original pattern piece onto the muslin piece to be sure it hasn’t stretched out of place while you were ironing it, ripping seams, re-sewing it, or during any of the on and off involved in the fitting process.
Ms. Knight creates all her paper pattern pieces with a 1″ seam allowance and 1 1/2″ hem allowance.
When she sews the pieces together, she simply uses a 1″ seam allowance on her machine and matches the notches – just like you would using the 5/8″ seam.
For some reason, I don’t like sewing a 1″ seam allowance. I feel I can get a much more accurate fit if I thread trace all of my seams by hand. This means that instead of tracing my pattern piece and adding a 1″ seam allowance, I use the piece with no seam allowances. This is a great deal more work but I feel it is totally worth the time.
I will discuss thread tracing with photos in Lesson 4.
One last decision is whether or not to make a right and a left side for each pattern piece. This is a decision you must make based on your muslin fitting (were both sides pretty close or is one side of your body significantly different from the other?). I have an acquaintance who was in an accident that left her with a twisted spine. She finds success in her pattern making by tailoring each piece to fit her body.
Ms. Knight does not do this but I have seen others do it whose sides are symmetrical. For this project I may just go ahead and do it and report back on whether or not I feel it worth the time.
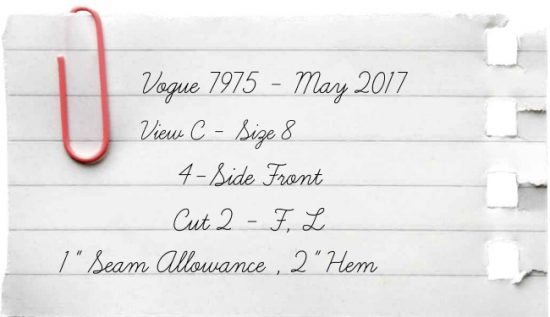
The last bit of information that I think is most especially helpful is writing all pattern information on every pattern piece. I have neglected to do this thinking I would remember – I never remember.
Upcoming Post – Lesson 3 – Materials
In my next post, I’ll be discussing some of the things my friends and I discovered when looking at our fabrics. If you have not yet purchased your fabric, you may want to wait for this post.
Until then, thanks for reading. V
Resources
I have purchased my supplies in bulk since I go through them but when I bought my tracing paper, I asked several of my sewing friends if they would like to purchase a piece from me – voila! Now we all have some.
Tracing Paper – 26″ X 39″ Wax Tracing Paper (Available in White, Red, Navy, Yellow and Light Blue) This tracing paper is fabulous because it’s huge. You can lay your entire pattern piece on it without having to move it around.
Craftsy Fitting Classes
I am a Craftsy Affiliate. This simply means that if you click these links, you will go to Craftsy. If, while you are there, you decide to purchase a class, I will receive an itty bitty bit of dinero. If you do purchase through my link – Thank you very much!
Custom Fitting: Back, Neck, and Shoulders
Easy Fitting the Palmer/Pletsch Way: Shirts & Tops
Fast-Track Fitting: In the Details
Fitting Essentials: Customize Your Dress Form
Fitting Sewing Patterns: Essential Techniques
worldwide pharmacy kamagra
buy propecia in netherlands
cialis .com
cialis order usa
cialis 10mg tablets price
how to get viagra tablets
stromectol liquid
how much is ivermectin
stromectol tab
ivermectin 0.5% brand name
ivermectin 200mg
ivermectin lice oral
buy ivermectin stromectol
ivermectin 12 mg
ivermectin usa price
where to buy ivermectin
stromectol online pharmacy
ivermectin 0.08
stromectol cost
stromectol pills
ivermectin where to buy
ivermectin 3
ivermectin pills canada
stromectol tablets buy online
where to buy ivermectin pills
ivermectin 0.08
ivermectin topical
buy ivermectin uk
ivermectin 0.08%
stromectol order online
ivermectin brand name
ivermectin pill cost
stromectol drug
stromectol buy uk
buy ivermectin stromectol